Look Ma! No Glasses!
A geologist uses topographic maps to measure slopes, depths, heights and the general shape of landforms.
/https://tf-cmsv2-smithsonianmag-media.s3.amazonaws.com/accounts/headshot/blog_headshot_spudis-300x300.jpg)
/https://tf-cmsv2-smithsonianmag-media.s3.amazonaws.com/filer/62/7f/627f6378-82d0-4ae1-ac30-893772bc9718/1.jpg)
A geologist uses topographic maps to measure slopes, depths, heights and the general shape of landforms. To aid in reconstructing the depositional and erosional history of a chosen landscape, the geologist needs to study the shape of features in the given area in quantitative detail in order to unravel the processes and history of their formation.
In addition to topographic maps, a field geologist uses aerial photographs (overlapping images taken at specific intervals as an aircraft flies over the target area). Because any two adjacent images are taken from different spots above the terrain, they can be examined in stereo, thus giving scientists three-dimensional views of the landscape. This “qualitative” stereo is a powerful interpretive tool; by viewing the bumps and holes of the terrain, we gain broader insight into its evolution.
Geologists have long relied on stereo photographs to understand geological processes on the Moon and other planets. Spacecraft, taking images of the same area from different points in orbit, make stereo pairs. Stereo images of the Moon’s craters and basins are truly spectacular, as are three-dimensional images of the towering mountains of basin rims and the deep, trench-like canyons of the sinuous rilles in the volcanic maria.
Few of these stereo images make their way to public release and when they do, they tend to be published as red-blue anaglyphs, wherein two different frames of a stereo pair are printed slightly offset in red and blue ink. When these anaglyphs are viewed with special red-blue plastic glasses, a stereo image appears.
The problem with anaglyphs is that you never seem to have a pair of the red/blue stereo glasses handy when you need them. Also the purplish, color-fringed image created when viewing anaglyphs is a bit bilious. Because of these cumbersome limitations, few stereo images receive widespread viewing.
Fortunately, it is possible to see images in stereo without using specialized optical stereo-viewers. The method is called “free viewing” and requires only a little practice to train your eyeballs to focus separately on two different images at the same time. Once you’ve acquired this skill, you may find that viewing images in stereo is easy and enjoyable. You may even decide to take up stereo photography yourself – there’s no reason it cannot be done by anyone with a camera and the willingness to take two pictures from slightly different viewpoints.
Free viewing simply requires that you relax your vision and let your eyes slightly de-focus (a sensation of slightly crossing your eyes). Follow the simple trick I’ve borrowed from the book On the Moon with Apollo 17: A Guidebook to Taurus-Littrow by Gene Simmons (NASA EP-101, Washington DC, 1972), issued around the time of the Apollo missions.
First, situate yourself a comfortable distance from the screen then click on the image. I have scaled the pictures presented here so that they should be comfortable for stereo viewing by most readers, but you may need to slightly change the magnification to get the best results, just as a pair of binoculars must be individually adjusted to people with differing ocular separation. Note the designated “Fusion Spot” below each image. Now relax your vision as you focus one eye each on the two different spot images. The “Fusion Spot” images will swim around, until they “fuse” in the middle as a single image. Initially, you will see three images (the two original images on either side of the fused image). With practice, you’ll find that you can ignore the two side images, or they may even naturally disappear as you focus on the newly created center image. Some people find that it’s easier to focus directly on the photo itself rather than beginning the process by focusing on the “Fusion Spot.” Like riding a bike, once mastered, this skill can be used at will.
The lunar images I’ve chosen all have dramatic contrast in terrain, so while free viewing them you will see spectacular three-dimensional views of the Moon in areas where it is difficult to understand geological processes using only single, monoscopic images. Are you ready to try your new skill?
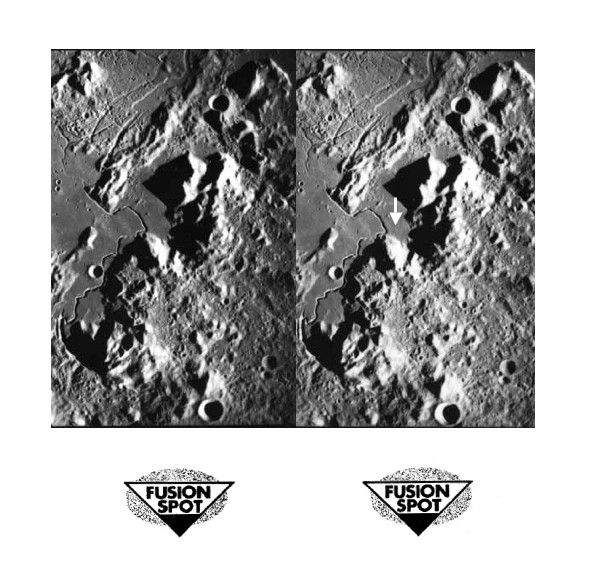
The Apollo 15 mission landed in a small valley adjacent to the towering Apennine Mountains on the Moon (Fig. 1). Click on this image to bring it up on the screen. Using the free viewing technique described above, look at this lunar scene. Note that the smooth mare plain where the landing site is located (arrow) is significantly lower than the surrounding mountains. In fact, it appears that the back slope of the Apennines (lower right of scene) forms a “plateau” or elevated region south of the landing site. These mountains were created during the excavation of the gigantic Imbrium basin and make up the rim deposits of that feature.
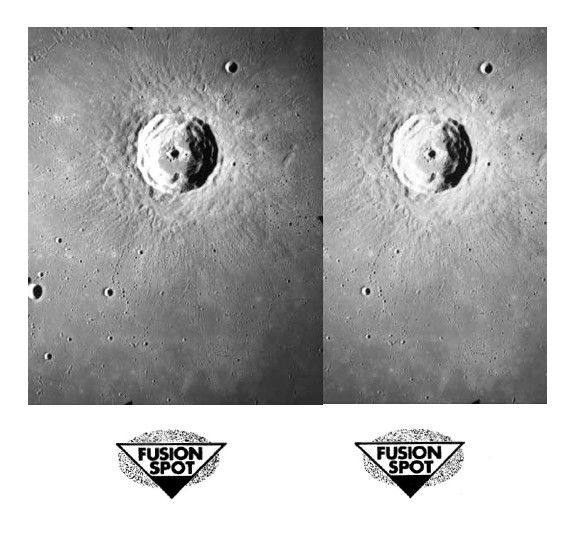
The crater Timocharis (Fig. 2) shows the features typical of large impact craters. Note that the rim of this crater is elevated above the surrounding, outside terrain. Rim uplift is caused both by the piling up of ejecta from the crater and also by structural uplift of the target rocks during crater formation. Unlike most craters in its size range, Timocharis has a central depression rather than a peak. This depression may have been caused by the collapse of the central uplift during the last stages of crater formation.
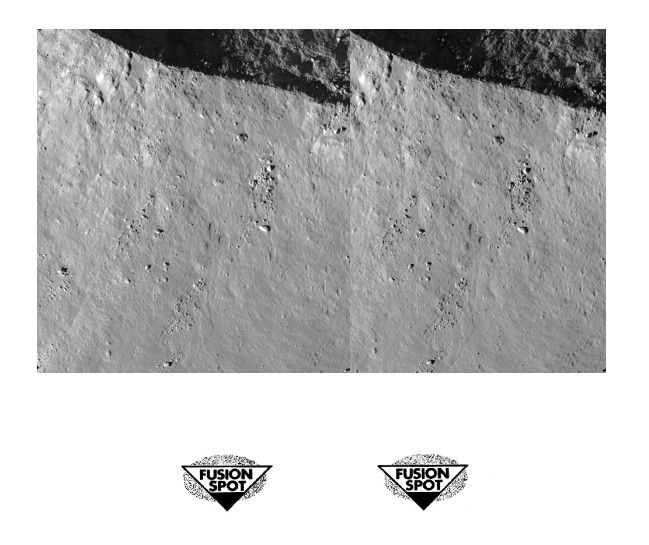
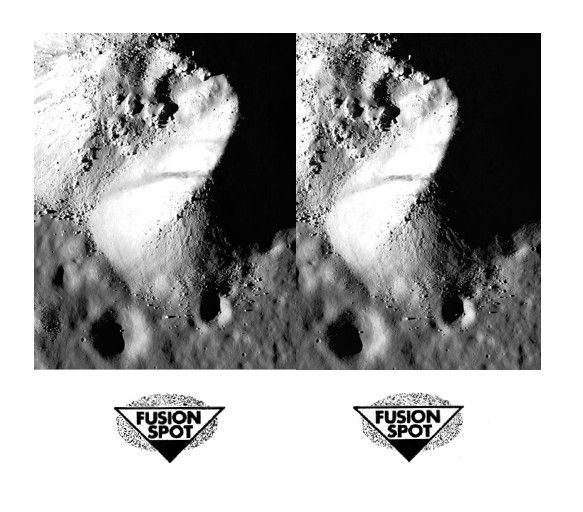
The new high-resolution pictures from the Lunar Reconnaissance Orbiter Camera (LROC) are amazing when viewed in stereo. Figure 3 is a close-up of a central peak of the large, rayed crater Copernicus. This site was targeted for a visit by Apollo 20, the last Apollo mission (which was cancelled in 1971). We now know that it contains rocks that cooled slowly at depth inside the Moon. The central peaks of complex craters are thus prime scientific targets both for bringing up such deep-seated rocks but also to sample the shock melt created by the impact for precise dating of the crater. This stereo pair shows both very large boulders strewn around the peak (the largest are 10-15 meters across) and smooth deposits on the side of the peak that are probably pools of shock melt formed during impact.
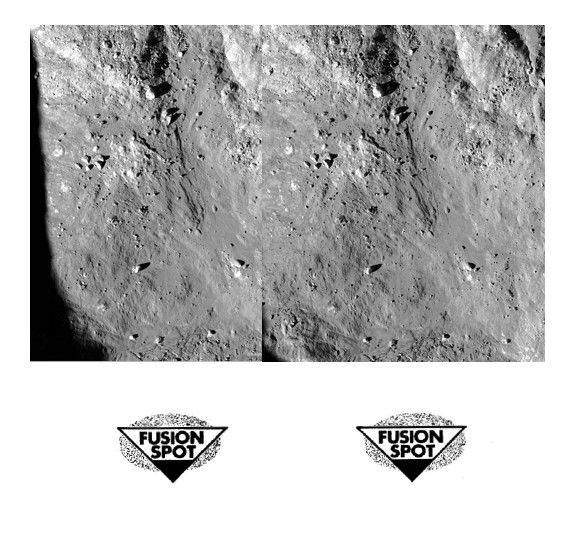
Figures 4 and 5 show features of the amazing far side crater Giordano Bruno, one of the youngest, freshest landforms on the Moon. Figure 4 shows the thick pile of rock debris in the crater floor, shed from the walls of the crater during its final stages of formation. This debris pile includes pools of impact shock melt and is strewn with boulders on the crater floor. The rim of Giordano Bruno also shows large blocks and flows of solidified impact melt (Fig. 5). The best images from the LROC Narrow Angle camera show features as small as one-half meter across. These images are completely changing our appreciation for the nature of the Moon and its rocky surface.
Stereo images add new dimensions of appreciation for the beauty and wonder of the lunar surface and its features. Once you master the technique of “free viewing,” you can enjoy these spectacular views any time, without the need for cumbersome stereo glasses or the annoying false coloration resulting from anaglyph viewing.
/https://tf-cmsv2-smithsonianmag-media.s3.amazonaws.com/accounts/headshot/blog_headshot_spudis-300x300.jpg)